Mesh creation tips: vertex placement
April 20th, 2020
Meshes can be difficult to get right, not only for beginners, but also for seasoned riggers, especially when it comes vertex placement and weights. In this post, we'll discuss some tips that will help you create better meshes using various vertex placement strategies.
If you are not yet familiar with meshes, have a look at our meshes section in the Spine user guide.
Principles of good mesh structure
What makes a good mesh? Given an image, there's an infinite number of meshes and weights you could come up with, subject to the purpose of the mesh. Irrespective of your use case, here are a few general guide lines you can follow while creating your meshes.
Follow natural folds and edges

If you are lost and don't really know where to start placing your first vertices on the mesh, look for the natural folds of the images you want to create a mesh for.
Specifically, try to identify edges that separate one area from another. These edges can be visible lines, changes in color or angle, and so on. Thankfully the human eye is fantastic at detecting such separating edges!
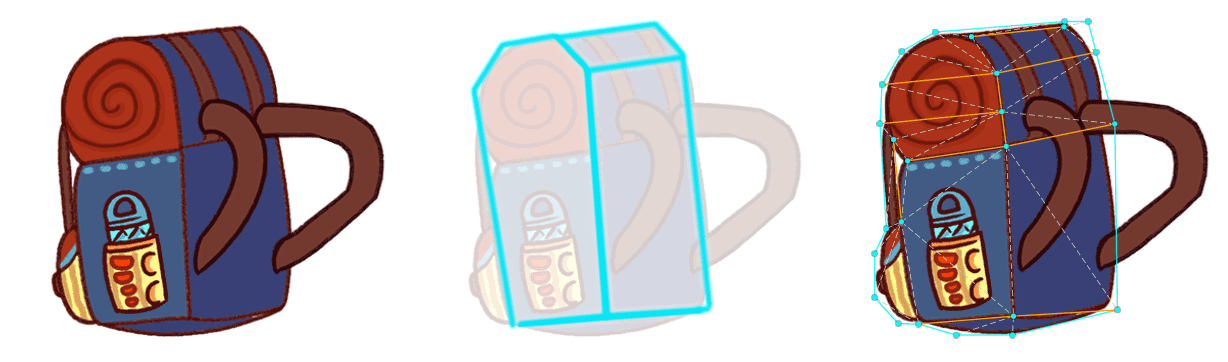
To create the outer hull of a mesh, start from a corner in the image and place as few vertices as possible to approximate the general outline of the image. Even better, use the trace feature to finish this step faster. You might want to touch up the output by removing vertices and moving vertices closer to the image's pixels without cutting parts of the image off.
For inner vertices, start from the parts that help to convey the shape of the mesh first by placing a vertex in corners, or at the start and end of important edges that define the structure of the mesh.
Outline features with vertices
When dealing with something as complex as faces, a good rule of thumb is to start by outlining each feature of the face - nose, eyes, eyebrows, mouth, etc. - by placing at least one vertex on each side of every feature. This allows you to isolate the features and give them plasticity. It also makes it easier to define and add vertices to each facial feature.
You can see an example of this same logic in a frame of this tip where the process to rig a face is shown:

Only add the vertices you really need
It is tempting to think a lot of vertices will give you more control over your mesh. In reality, too many vertices will make working with your meshes harder, be it weighting, selecting vertices, or creating deforms. The mesh tools view and the weight brushes can help making these tasks easier. But too many vertices can also have a detrimental effect on the runtime performance of your skeleton. A very useful tool to keep the number of vertices in check is the metrics view.
With this in mind, always start with the least number of vertices possible. Only add vertices where required to create the rough shapes you need. Set the weights on this minimal mesh so it deforms like you want, then add more vertices as needed for finer control. When you add these additional vertices, Spine will automatically calculate their weight based on the existing surrounding vertices, making your job much easier.
You can see several examples of meshes in the tip below. Note how most areas are sparse in terms of vertices, while only important features have a higher density of vertices:
Concentrate vertices around the parts that convey the shape
We've learned to use vertices to model features, and that superfluous vertices shouldn't be added. Here's another tip on where to place vertices: place vertices so that the resulting mesh conveys the shape of the object.
Curved, bendy surfaces using only 3 lines and weights
How much can one get away with, when trying to reduce the amount of vertices? If you're trying to simulate something curved and bendy, try to avoid falling in the trap of adding a gazillion vertices to match the curve.
As demonstrated in this tip, straight images bend better than already curved ones. If you start out with an already bent image and try to bend it in the opposite direction, you'll have a bad time.
A straight image, on the contrary, gives you much more usable angular deformation using less vertices.
In fact you can simulate softly bending objects with as little as 4 vertices per side. Give it a try! Not satisfied with the result? Add a few more vertices strategically, without going overboard. In most cases you'll find there is no need to add more vertices, especially when considering the actual size it will be seen. Your runtime performance will thank you! This tip shows a comparison of many vertices versus less vertices in movement. Can you spot the difference?
Harmonious structures deform better
A mesh made of equidistant or proportionally distant vertices will usually deform better than one where vertices follow a more random placement. This is because when a vertex moves, the amount of the image that deforms depends on the distance to other vertices. When some vertices are much closer than others, the deformation often doesn't match how most real world materials behave.
Symmetrical vertex placement, like the longitude and latitude lines on a map of the Earth, helps to make believeable and consistent deformations. Bending one direction will behave similarly to bending in the other direction. However, even when bending in only one direction, a symmetrical mesh structure helps the mesh to mimic the solidity and consistency of real world materials.
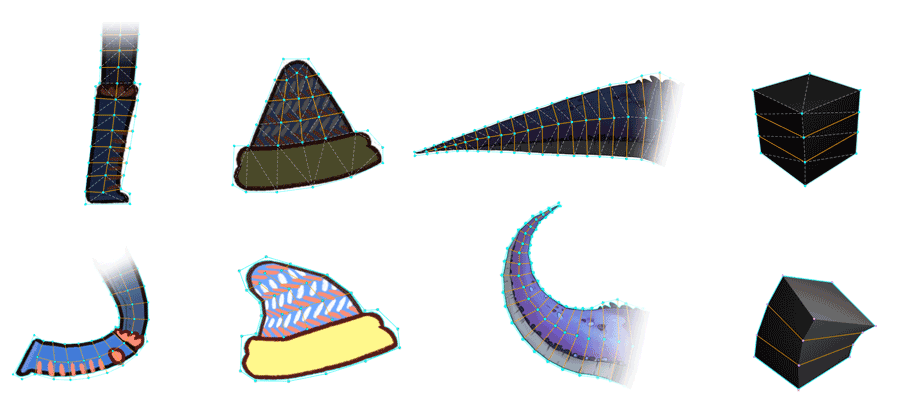
Here are a couple of examples of harmonious, mostly symmetric, easily deformable mesh structures.
Don't be afraid to change your mesh later
This last tip may be obvious, but it's one of the most important ones. Don't be afraid to experiment or to try to get away with less. If something doesn't work exactly how you envisioned, go back to setup mode and adjust the mesh structure or touch up the weights. Even better, you can do so while looking at a moving result by keeping the Preview view open next to you.
In the future we will also explore weighting techniques in more detail, although you can already find some examples in our tips section. Did you find these tips useful? Join the discussion of this post on the Spine forum!